There are lots of different ways to style your hair, but one of the most classic and elegant styles is the French braid. A French braid is a type of plait that involves braiding the hair close to the scalp, using three sections of hair instead of just two. This braid is perfect for special occasions or everyday wear, and it can be done on any length of hair. If you’ve always wanted to learn how to French braid your own hair, read on for a step-by-step guide.
Start with clean, dry, and styled hair. If your hair is dirty or oily, it will be more difficult to work with and the braid will not look as neat. If your hair is wet, it will be too slippery to braid. Make sure to brush through your hair to get rid of any knots before you start braiding.
Start with a small section of hair at the front of your head, near your forehead. Take three small sections of hair and begin to braid them together, crossing the outer sections over the middle one. As you braid, add more hair to each section so that you’re including more and more of your hair in the plait.
When you reach the end of your hair, secure the braid with an elastic band. You can finish off the look by wrapping a small section of hair around the elastic band to conceal it. And there you have it—a perfect French braid!

Gather the Hair for Your French Braid
Start by gathering all of the hair that you want to include in your braid. If you want a traditional French braid, this will be all of the hair on your head. If you want a partial braid or a different kind of braid, you can choose which section of hair to use. Once you have gathered your hair, comb it thoroughly to remove any knots or tangles.
If your hair is very long, you may want to divide it into sections to make it easier to manage. Start by dividing the hair into three sections. If you have very thick hair, you may want to divide it into four sections. Once you have divided your hair, you will begin braiding it in the traditional French braid method.
Start by taking the section of hair closest to your forehead and divide it into three smaller sections. Cross the left and right sections over the middle section. Then, take the middle section and cross it over the left section. Finally, take the right section and cross it over the middle section.
Now, you will begin adding in hair from the sides of your head. Take a small section of hair from the left side of your head and add it to the left section of hair. Then, take a small section of hair from the right side of your head and add it to the right section of hair. Continue adding in hair from the sides as you braid.
As you braid, make sure to keep the sections of hair tight so that your braid looks neat. When you reach the end of your hair, secure the braid with a hair tie or elastic. You can also secure the braid with bobby pins if you need to.
Divide the Hair Into Three Sections
When it comes to French braiding, the key is to divide the hair into three sections. This may seem like a daunting task, but once you get the hang of it, it’s actually quite easy.
To start, take a small section of hair from the front of your head and divide it into three equal parts. Then, take the middle section and cross it over the other two sections. Next, take the section of hair from the back of your head and cross it over the middle section. Finally, take the last section of hair and cross it over the back section.
Now that you have the basic technique down, you can start to experiment with different ways to divide your hair. For example, you can try taking larger or smaller sections of hair. You can also try different patterns, such as crossing the back section over the middle section first.
Once you have the hang of French braiding, you’ll be able to create all sorts of different styles. So go ahead and experiment until you find a style that you love!
Cross the Right Section Over the Center Section
If you French braid your own hair, you know that the process can be a little bit challenging. But don’t worry, we’re here to help! In this blog post, we’ll walk you through how to cross the right section over the center section when French braiding.
To start, gather a small section of hair from the right side of your head. Then, take the middle section of hair and cross it over the right section. Now you’ll have three sections of hair.
Next, take the right section of hair and cross it over the middle section. Then, take the left section of hair and cross it over the middle section. You should now have three sections of hair again.
Repeat these steps until you reach the end of your hair. Once you reach the end, secure the braid with a hair tie or elastic.
There you have it! Now you know how to cross the right section over the center section when French braiding.
Cross the Left Section Over the Center Section
Do you know how to do a French braid? If not, don’t worry! We’ll show you how. First, gather all of your hair to one side. Next, take a small section of hair from the outside and cross it over the center section. Then, take another small section from the outside and cross it over the new center section. Repeat this process until you reach the end of your hair. When you’re done, you should have a beautiful French braid!
Add Hair to the Outside Sections
I’m going to show you how to add hair to the outside sections of your head. This will give you more volume and fullness. You will need:
- A rat tail comb
- A teasing brush
- Hairspray
- Elastics
Start by spraying your roots with hairspray. This will help the added hair to stay in place. Next, take a small section of hair from the top of your head. Comb it back and forth with the rat tail comb to loosen it up. Then, take your teasing brush and backcomb the hair. Do this by holding the hair at the roots and brushing it back and forth towards the ends. Do this until you have a good amount of volume.
Now, take a small section of hair from the back of your head and combine it with the section you just teased. Start french braiding this section towards the front of your head. As you braid, add in small sections of hair from the sides of your head. When you get to the front of your head, tie off the braid with an elastic.
Repeat this process on the other side of your head. You can also add in some curls for a more glamorous look.
Repeat the Braiding Step
French braids are a classic hairstyle that can be worn by anyone. Though they may seem complicated, they are actually quite easy to do. Here’s a step by step guide on how to French braid your own hair.
Start with clean, dry, and brushed hair. If your hair is oily, use a dry shampoo to absorb any excess oil. Separate your hair into three even sections.
Start with the outermost section and begin to tightly twist it. As you twist, bring the section towards the center of your head. When you reach the center, begin to braid the section by crossing it over the middle section.
Now take the innermost section and cross it over the middle section. As you do this, begin to loosen the twist on the outermost section. This will help the braid lay flat against your head.
Continue to braid the sections, crossing the outermost over the middle and then the innermost over the middle. As you braid, continue to loosen the twist on the outermost section and pull the braid gently to make it tighter.
When you reach the end of your hair, secure the braid with an elastic. You can also choose to tuck the ends of the braid under the braid to create a neat and polished look.
Secure the End of the Braid
When you’re finishing a french braid, it’s important to secure the end of the braid so that it doesn’t come undone. There are a few different ways that you can do this. You can use a rubber band, bobby pin, or hair tie.
If you’re using a rubber band, simply take the rubber band and wrap it around the end of the braid. Make sure that the rubber band is tight so that it will stay in place.
If you’re using a bobby pin, take the bobby pin and insert it into the end of the braid. Then, twist the bobby pin so that it secures the braid.
If you’re using a hair tie, tie the hair tie around the end of the braid. Make sure that the hair tie is tight so that it will stay in place.
Once you’ve secured the end of the braid, you can continue on with your day knowing that your braid will stay in place.

Tips for Perfecting a French Braid
If you’re looking for a chic and stylish way to keep your hair out of your face, a French braid is the perfect option. But if you’ve never attempted this type of braid before, it can seem a bit daunting. Fear not! We’ve put together a few tips to help you master the French braid.
Start with clean, dry hair. This will help your braid last longer and prevent flyaways. If your hair is on the oily side, you can spritz it with a dry shampoo before you start braiding.
Start with a small section of hair at the front of your head. You can always add more hair as you go along, but it’s easier to add than to take away.
When you’re adding new sections of hair, be sure to add them close to the scalp. This will give your braid a nice, tight appearance.
As you braid, keep your tension even. This can be a bit tricky at first, but once you get the hang of it, it’ll be a breeze.
When you reach the end of your hair, secure the braid with an elastic. And voila! You’ve successfully created a French braid.
Alternatives to the French Braid
If you’re looking for a change from the classic French braid, there are plenty of alternatives to choose from. Here are a few of our favourites:
The waterfall french braid

This braid looks complicated but is actually fairly easy to achieve. Simply start with a normal three-strand braid and let go of the outermost strand after each stitch, allowing it to cascade down your hair.
The fishtail french braid

This is a more sophisticated version of the classic three-strand braid. To create it, take small sections of hair from the outside of each strand and cross them over to the other side, alternating as you go.
The Dutch french braid

Similar to the French braid, but with the addition of an extra strand. To create it, simply braid the hair as normal but also pull in small sections of hair from underneath as you go.
The reverse French braid

This is essentially a French braid turned upside down! Start by braiding the hair close to the scalp and then continue down the length of the hair, adding in new strands as you go.
The lace french braid

A pretty and delicate braid that looks great on all hair types. To create it, take small sections of hair from the outside of each strand and cross them over to the other side, alternating as you go. As you do this, the hair will start to twist and create a ‘laced’ effect.
The rope french braid

This is a really easy braid to achieve and looks great on both long and short hair. Simply twist the hair into two ropes and then tie them together in a knot.
The halo french braid
Perfect for those with long hair, this braid is created by wrapping the hair around the head like a crown. Start at the front of the head and work your way around, securing the braid with bobby pins as you go.
The milkmaid french braid

This is a pretty and romantic braid that looks great on all hair types. To create it, divide the hair into two sections and then braid each section separately. Once you’ve reached the end of each braid, secure them both together at the back of the head with a hair tie.
9. The four-strand french braid: This is a more complex braid but looks really impressive when finished. To create it, take four sections of hair and then plait them all together as you would a normal three-strand braid.
10. The sideways French braid: This is a really quirky and fun way to wear a French braid. Simply start braiding the hair from one side of the head and continue down to the other, adding in new strands as you go.
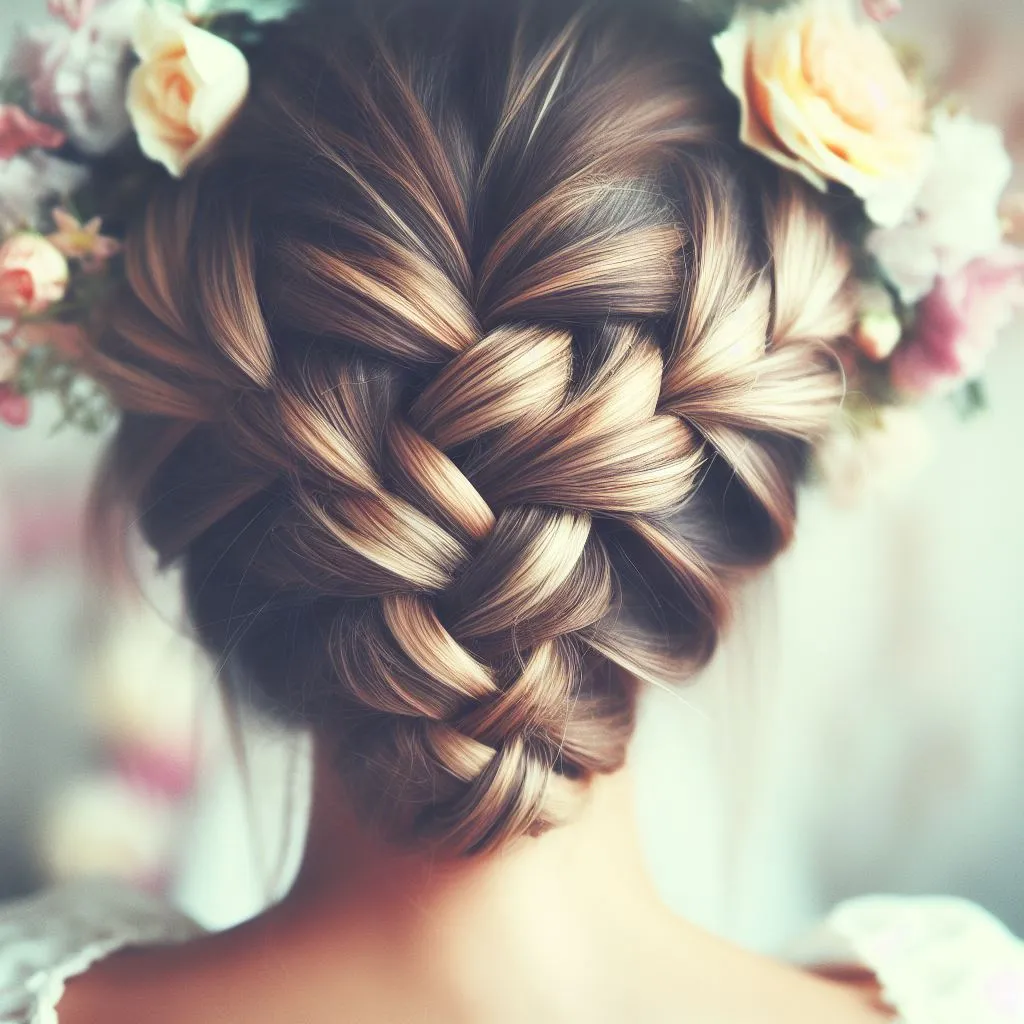
Easy Ways to Accessorize a French Braid
There are tons of easy ways to accessorize a French braid! You can use anything from flowers to beads to add a little extra flair to your hairstyle. Here are a few of our favorite ideas:
1. Start by adding a few small flowers near the top of your braid. This is a great way to add a pop of color and make your braid look even more feminine.
2. If you want something a little more subtle, try adding a few beads to the end of your braid. This is a great way to add some sparkle without going overboard.
3. For a more edgy look, try adding some small metal charms to your braid. You can find these at most craft stores.
4. If you’re looking for something really unique, try braiding in a few colorful ribbon strands. This is a great way to add some fun and personality to your braid.
5. Need a quick and easy way to dress up your braid? Simply add a pretty scarf or headband. This is an easy way to add some color or pattern to your look.
So there you have it! Five easy ways to accessorize a French braid. Which one will you try first?